
Update
This page is very out of date and I will change it as soon as I get time. Many of the parts have been re-made from Aluminium. The printer is now a CoreXYUVAB with a dynamic load balancing gantry. It now uses Duet Generation 3 electronics. It has 6 Bondteh BMG extruders, completely different filament holders, a different hot end, a DC UPS, and many other changes.
Below are some pics and details of the printer I’ve built, mostly from Open Builds V slot. I’m not going to bore anyone with the full build log but here is a brief description and details of some of the more unusual features:-
It’s a Core XY design incorporating a Diamond hot end fed by three E3D Titan five Bondtech BMG extruders. The hot end is slung between two 2020 horizontal rails forming the X axis. The frame is 600mm x 600mm x 1,000 mm with another 500mm added to the top to take the filament spools and additional extruder gantry. Build area is about 355mm in X by 340mm in Y and 760 mm in Z. The Y axis is two 4020 rails which also serve as the top frame members. The bed consists of two layers of rigid insulation, an 800W 240V silicone heater, a 400mm x 400mm x 10mm thick machined aluminium tooling plate topped with removable 6mm float glass. The bed moves in the Z direction, driven by three 8mm x 1mm pitch screws via a continuous belt and single motor. Separate V slot linear guides prevent and “wobble” or twisting. The extruders are mounted on a separate carriage which is passively moved by the man XY carriage now actively driven as a separate CoreXY gantry, which enables me to use short (about 170 mm) Bowden tubes. This second gantry is homed separately using additional U and V axes. Electronics are Duet Ethernet with the Duex5 expansion card.


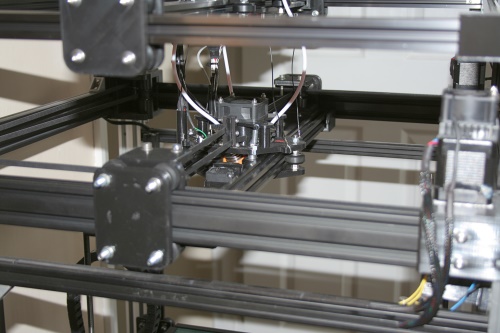
I did try a single rail design with the hot end hanging over one side. It saved weight and increased the available X and Y travel but it wasn’t nearly so solid so I reverted back to a dual rail design. The belts are stacked and run parallel to the X and Y axes but cross at the rear. They run along the centre line of the two X rails and attach to the centre of the X carriage, so as not to impart any twisting force to the carriage. The motor mounts are slotted to allow belt tensioning using captive thumb screws and lock nuts.

I designed my own case for the Duet plus Duex5 expansion board. There are two fans which blow air onto the back of the boards. They are are controlled thermostatically – there is a post in my blog which gives more details and the enclosure is listed under “Published Designs” with a link to the files.

The hot end nozzle itself acts as the bed probe. Here is how it works. Firstly the X carriage has 3 oil filled bronze bushes inserted – shown here:-

Then the Diamond hot end mount has 3 steel dowels which line up with bushes as shown here:-

So when it’s fitted together it looks like this.

It’s rock solid in X and Y but free to move in Z. During testing I discovered that in may not always rise completely vertically when the tip of the hot end was pressed upwards. Sometimes one corner would lift more than the other two. So I decided to exploit that and fitted the two retaining springs that you can see, which clip onto lugs on the hot end end mount. I also reamed out the bronze bush that is furthest away and not visible in the picture, to create a bit more clearance for the dowel pin. This means that upwards pressure will always lift the furthest corner and that’s where I’ve fitted my homing switch. You can just about make it out in this next picture
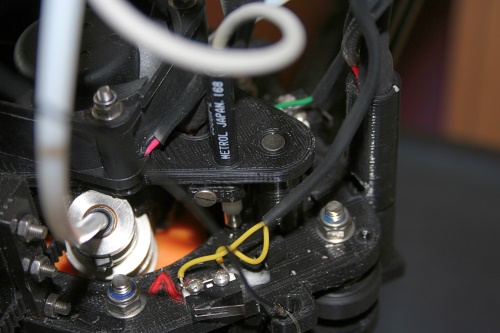
This is the Metrol positioning switch that I’ve spoken about in my blog. It’s high accuracy with a claimed repeatability of 0.005mm. My initial intention was to fit it to the carriage so that the hot end mount would press down against it. Unfortunately it was too long and I’ve had to fit it the hot end mount instead, which means that whenever I change hot ends, I have use a screw driver for what is otherwise a tool free operation. Also, I have to reset the Z offset for the switch. Fortunately, the built in LED makes it easy to see when the switch is triggered or not, which makes fitting it a lot easier than it might otherwise be.
The switch is a normally open design but used in this way, with it being closed when the hot end is on it’s seat but open when it’s not effectively inverts the logic meaning that if it fails, it will fail safe (in as much as the bed could not crash into the hot end during homing).
Because the hot end is restrained on one side by the springs, it acts like a lever so any upwards movement of the hot end is amplified at the switch position meaning that I only need 0.2 to 0.4 mm or so of nozzle movement to trigger the switch. The switch trigger point is 0.3mm from the tip so careful setting of the switch could reduce teh Z offset even further but it’s not really necessary.
This next picture shows the fully assembled hot end. Note that the Bowden tubes are under compression which also helps to keep the hot end pressed down on its seat but I’ll cover the extruder mounts later.

In the above picture you can see one of the two print cooling fans. These blow air through ducts in the lower X carriage which directs the flow downwards onto the printed part and away from the nozzle. It’s difficult to photograph especially with my penchant for making all my parts in black filament (E3D Edge PETG by the way) but here is an openscad image. This part was updated in July 2018 to take 40mm blower fans instead of the original 30mm fans.

The rest of this section has now been superseded by my latest 5 colour upgrade which you can see here 5 Colour upgrade
