

As readers of my bog will know, I have been using a Diamond hot end for quite some time. One of the issues with this hot end is that it doesn’t actually mix colours all that well. What happens is that the filament exits the nozzle somewhat like stripey toothpaste. The featured image above shows how this manifests itself. This was a simple hollow cylindrical container that I created by using a custom script to alter the mixing ratios in 1% increments at every layer change. So, the colours “fade” from 100% Red and 0% Blue to 0%Red and 100% Blue then from 100%Blue and 0% Yellow to 100% Yellow and 0%Blue and finally from 100%Yellow and 0%Red back to 100% Red and 0% Yellow.
The three pictures above are the same object viewed from different angles. The one on the left is roughly at the angle where the Blue filament enters the hot end, the one in the middle is roughly where the Yellow enters and the one on the right is roughly where the Red enters. You can see that the colour is biased towards the inlet position in the hot end for that particular filament.
The effect can be largely negated by using translucent filaments.
Or, it can be exploited. To explore this a bit further, I created a simple pyramid and orientated it on the build plate such that each face was in line with each of the filament inlet positions. I defined a single tool with mixing ratio of equal proportions for each of the 3 filaments. In this case, the filaments that happened to be loaded at the time were Red, Black and Gold. So the tool was using roughly 1/3rd of each colour. Then I printed the object just as one would using a “normal” hot end and took three pictures, each at 120 degrees around the object. Here they are:
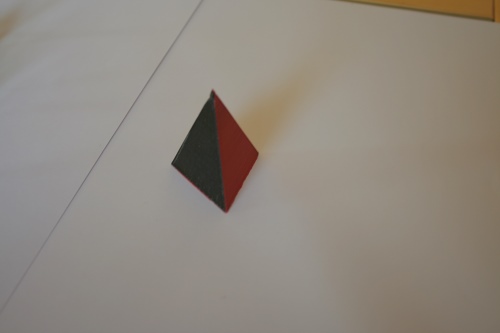


As you can see, each face is a different colour although they were all printed at the same time, using the same tool with no fancy tool changes or post processing. The top picture shows mostly Black on the left and mostly Red on the right. The next picture down with the object turned 120 degrees shows mostly Red now on the left and mostly Gold on the right. The last picture is with object turned another 120 degrees so the mostly Gold is now on the left and mostly Black is on the right. I say “mostly” because there is some mixing of the colours on each face but they are strongly biased towards the position where each filament enters the hot end.
I just wanted to show this as an illustration that sometimes what may be seen as defective or unwanted behaviour, can be exploited to ones advantage. (That is of course if one has a need for a 3 sided object with each face being a different colour).
Now on to the next picture and one that had me baffled for some time.
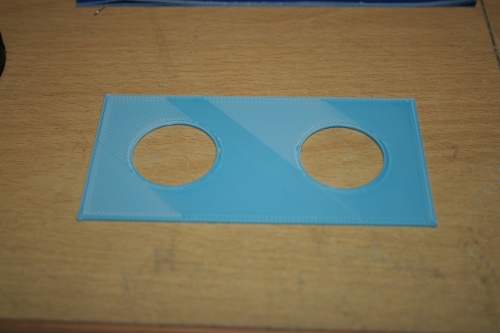
I was printing something else when I came across this issue (always an issue – never a problem). So I made a simple rectangle with two holes in it, so that I could evaluate what was happening. As you can see, there is a distinct colour shift. Some sections are darker than others (or lighter depending on your point of view). It was printed mixing two filaments, Blue and White in equal proportions. It is consistent and reproducible. It will happen with any combination of extruders. i.e. extruders 0 and 1, extruders 1 and 2 or extrudes 0 and 2. There is no change in layer height or any sign of over or under extrusion. The extruder gears all appear to rotate at the same speed.
After a lot of head scratching and a lot of testing, I finally realised what was causing it. When it is printing, the infill is at 45 degrees and the head starts just below the left hand hole and moves diagonally in the direction of top left to bottom right whiles traversing toward the right hand side. This is the dark section. So it goes all around the bottom of the hole, then it reaches the right hand side of the hole after which it goes all the way to the top of the print. Then it reaches the right hand side of the right hand hole, and goes around it.
So for all of these moves, each new line of filament (apart from the first line) is supported by or squashed up against, the previous line on the left but has free space on the right.
Once the print head reaches the top right corner of the print, it then moves to the nearest unprinted section which is the top of the right hand hole, nearest to the right hand corner. To continue the print, the head still moves in the same direction diagonally but this time it is traversing from right to left instead of from left to right.
So now, for all these moves each new line of filament is supported by or squashed up against, the previous line on the right but has free space on the left.
Going back to what we now know about the filament coming out as stripey toothpaste, it is reasonable to deduce that the colour of the “mixed” filament changes depending on whether the filament is supported and/or squashed on the left with free space on the right compared to being supported on the right with free space on the left. To put it another way, it seems that the newly extruded filament rolls or twists either towards or away from the previous line of filament thus giving a predominance of one colour over another depending on the direction that the head is traversing.
At least that is my theory. It explains what I have observed happening but like a lot of theories that come up in the world of 3D printing, it isn’t actually proven. The only way to do that would be to put the prints under a microscope.
Looks like that might have to be something to add to my tool box…….watch this space……..
Ian

After reading your initial comments on this subject at the DuetWiFi forum, I gave some though to the design of a true mixing hot end. I created a cad drawing that uses a four filament design similar to the Diamond but employs a slightly larger central mixing chamber where a shaft driven mixing blade would blend the various colors together before extruding into the print. The shaft would be motor driven from above. Although I see this technically doable, I also see it to be problematic in practical terms considering the larger volume that would need to be passed from the hot end at every color change. Also I doubt we’d be able to see mixed color clarity on the order of what we see in CMYK color printing. Your thoughts Ian…
LikeLike
Hi Terry,
Nice idea but you are not the first to think of this, see here http://forums.reprap.org/read.php?2,721308.
Personally, I think it may be possible to achieve true mixing passively and thus save a lot of the complexity. I’m thinking along the lines of chemical anchors and such like that are used in the building industry. Basically it’s a sort of 2 part epoxy that is kept separately in a walled tube but has a nozzle that makes the two compounds spiral together as they travel down the nozzle. Of course, anything that increases the size of the mixing chamber will increase the purge requirement.
As for true colour mixing my thoughts are that we need 6 inputs. CYMK is 4 but then we aren’t printing on white paper so we need white as well. That takes care of the hue (assuming we could get filaments that are true CYMK colours). My understanding of how inkjet printers works is that colour saturation is taken care of by altering the dot density. With 3d printing we can’t under extrude so the sum of all the filaments must always add up to 100%. Therefore to control colour saturation, we’d need to use transparent filament as well (to simulate dot density). Hence my reasoning that we’d need 6 inputs. I could be wrong on this and CYMK plus White might suffice.
Ian
LikeLike
Have you ever experimented with sending the different colors of filament through the hot end in short alternating pulses? Similar in concept to the pulses of color coming from a inkjet printer head. I am imagining code that alternates tiny extrusion and retractions between colors to induce turbulence and increase mixing.
LikeLike
That isn’t something that I had considered. I’m having difficulty in imagining how that could work in practice, given the need to keep the total amount of filament moving forward smoothly and by an amount dictated by the slicer for any given move. I’d guess it would mean a completely different slicer algorithm which broke every move into tiny segments but even so, I suspect that the resolution of any current extruder would be too course. If you take a segment size of say 0.5mm, then typically the extrusion amount would be 5% of that (0.5mm diameter nozzle with 0.3mm layer height). Then the mixing ratio for any one filament could be in single digit percentages of that amount. So you’d be looking at not just trying to extrude but oscillate something like 5% of 5% of 0.5 mm or around 0.001mm of filament.
LikeLike
I guess I was thinking that the extruder motors could be programmed to sequentially drop steps but any oscillation of that small a magnitude would likely get lost in the bowden assembly. Probably wouldn’t even make a difference on a direct system.
LikeLike
Hello!
I love all of the work you’ve put into making your own hotend and all of the research you’ve done up to this point. I have been looking into making my own multi color, single extruder printer and when i read this post it broke my heart. I’m sure you’ve seen Jason Powell’s 3d printer. How would you explain his perfect 3d prints while using the Diamond 3 hotend? ( https://www.youtube.com/watch?v=3Z_21b3xl20 ) It looks like his filament is a solid color. He’s using Excelvan filament. He went on to create his very own 5 input hotend and he gets amazing results without this effect. I’m really curious about your thoughts on this. Is his filament slightly transparent? Did he do a simple mod to it?
Thank you in advance!
Joseph Mason
P.S. I posted this comment already before I made an account and I’m not sure it went through. If it’s doubled just ignore one.
LikeLike
Hi Joseph,
I’ve seen that video before. Look and listen closely because he mentions that there is only one print that uses CY and M mixing – the others are all done using other solid colours – not the CY and M that he has loaded at the start of the video. You’d have to view the mixed print from different angles to notice the stripey toothpaste effect. If you haven’t already discovered my YouTube channel, take a look at the 9 colour print done with a stock 5 colour Diamond – about 8 minutes into this video https://www.youtube.com/watch?v=IG3AGKDzdH4. The colours green, purple, pink and orange are all mixed and they don’t look bad in the video. But if you closely, and from different angles the stripey toothpaste effect becomes much more noticeable.
As a side note, if there was a true mixing hot end that I could buy – I would. The only reason I’m trying to make one is that nobody sells one. 🙂
LikeLike
I’m still reading through your 6 hotend extruder posts, but I took some time to really quickly model up a solution to mixing the plastic without taking up too much volume. You cant make a normal static mixing chamber at such a small scale, so it would mess with the flow characteristics. But again, since you have experience dealing with this already, I would like to get your opinion on my idea.
Using nearly the same exact geometry as the Diamond hotend, I think it would be easy enough to drill and tap small holes near the tip of the nozzle and insert two M0.6 or smaller screws into the “mixing chamber”. This would mean milling a new nozzle from brass. But in your case it might just mean doing something similar in your mixing block before letting the molten plastic exit through the the extruder. Ideally the total volume that has to be crossed before getting out of the nozzle would still be very small and allow for quick color changes. Pics below.
https://imgur.com/a/RKVDsZ8
The geometry isn’t perfect for mixing, but it would be much better than nothing and it’s the best anyone could do with a mill and a lathe. The S shaped cavity the plastic would be forced to pass though is as close i could get to the internal mixing design autodesk patented a few years ago. And it only roughly doubles the volume of the original diamond hotend mixing chamber.
LikeLike
I started out with the idea of modifying an existing Diamond as it would save me a lot of grief and time. But the Diamond has other issues as well as the lack of mixing. One of which is that you can’t just swap nozzles. You have to change that entire brass cone which means a complete strip down of all the heat breaks, fan, heater and thermistor. There isn’t room to drill and tap the end to fit a standard M6 nozzle. So you’d have to braze an extension onto the brass cone and I don’t have the facility to do that. Then there are the issues with heat creep that the Diamond has – the 5 colour is particularly bad because the lower heat sink fins have been reduced in diameter in order to fit all 5, which makes them less efficient. And having them stick out at an angle of 22 degrees of so, makes for a very big footprint. Taking all that into account, I decided to try and make one from the ground up. I have a few ideas as to how I might be able to get the mixing done without having too high a melt volume or too much flow restriction. Right now, I’m still waiting for this whole Covid thing to settle so that I can get some more heat breaks.
LikeLike
Well thanks for all of the info. I’m excited to see how your hot end turns out! It will be awhile until I can make my own from scratch, but one last big question I have for now is would you recommend the D5 hotend, assuming I mod it that way you recommend to in your blogs? even with its shortcomings? I’m mainly looking for solid color mixing, not gradients. So if it’s prone to failure I would rather suck it up and buy a Palette filament splicer and a bunch of different colored fillament spools.
LikeLike
The D5 needs that extra cooling to overcome the heat creep issues, but that largely affects PLA. So one way around it is to use PET-G instead. Because PET-G has a higher glass transition temperature, it can withstand a bit of heat creep without bulging and jamming in the heat break they way that PLA does. Maybe a bigger question is how many things do you think you’ll be printing that can’t be made from transparent filament and that also have 5 different colours rather than 2 or 3? If the answer is “none”, then the 3 colour would be a better option. If the answer is “a few but not many”, then you have to weigh up the cost and complexity of adding 2 more extruders, as well as the higher cost of the D5 itself. Will your electronics have enough drivers or does that mean an additional expansion board? The costs can start to mount up. Then there is the issue of mounting 5 reels of filament on the machine. Can you do that easily? Only you can decide if the extra cost and complexity is worth it for the number of >5 colour prints you are likely to do. HTH. Ian
LikeLiked by 1 person
I finished going through your posts this morning. Do you have a discord? …………….. I just can’t find a direct message app on this site.
Cheers and thanks!
Joseph.
LikeLike
TBH, I get quite a few people asking me for chat sessions in one form or another but I just don’t have the time. The best thing to do is use the “contact” section and let me have an email address. Then if you get a list of questions, I can answer them as an when I get time. Or join a forum such as reprap – there are lots of knowledgeable people out there.
LikeLike